More Ways to Make Desktop Wallpapers out of Small Images

I never intended for my first article (How to Make Desktop Wallpapers out of Small Images) to be part of a series. However as I learn more about photoshop and my own methods of image editing, I realized there were more tools and techniques I used to fix these annoying little images into a workable background. And, I felt like the information was extensive enough to warrant a second article.


Cutting out the figure:
I realized that a lot of wallpapers I make are based around a central figure. Maybe it is a celebrity you like, or a favorite video game character. Whatever it is, only one part of the image is needed while other parts could be erased or replaced with a much bigger and more desirable background. So in this scenario, our best option is to just cut out the figure and transport them elsewhere. This can be done a number of ways. You could duplicate the picture into a separate layer and erase the background, being careful not to go over the lines of the figure, or you could select the figure with the lasso tool, found in the left hand toolbar. I recently discovered an additional feature of the lasso tool, called the magnetic lasso, via a hub by Hal Licino. By selecting this you can generally follow the edge of the figure all the way around, then use the regular lasso to fill in any gaps that the magnetic lasso missed because of similar colors in the background and the figure. To add to your selection hold down the shift key while you draw with the lasso, and hold down the alt key to remove sections. Once you’ve got only the figure, make a copy of them onto a new layer.
Now at this point, simply copy a background of your choice and paste it into a layer beneath your figure. Make sure that the wallpaper you use underneath the figure is large enough for your screen resolution, and you may also discover that the character looks way off in this new background. For example, let’s say you used a video game character with a real photograph as the background. Obviously they aren’t going to mix well. So it would probably be better to search for a background that was either a cartoon or a 3D render in order to make it fit better. Or, maybe both your figure and your background are photographic, but they still don’t look right. More likely than not this is because of either the lighting or the color scheme. If the two objects don’t have a light source coming from the same direction, you’ll have a lot of trouble getting them to blend naturally. You can fake it with the brightness/contrast tool, as well as the dodge/burn tool and color balance. If you’re interested, I described these processes both in my introductory photoshop article as well as my article about turning yourself into a superhero.


Part of a Frame
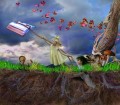
When creating a wallpaper for your desktop, it is always important to remember that your icons will be sitting on top of it. So it’s not a good idea to have your ‘my computer’ icon sitting on top of your figure’s face. You can move your icons, or you can design your wallpaper around this. I usually try to center any figure I use in a wallpaper since my icons are generally on the left. However if you use Windows Vista or Windows 7, you have the added obstacle of the gadgets. These fancy little apps sit on the right hand side of your desktop and display anything from the weather to your computer’s performance charts. While a lot of people just turn this feature off, I prefer to have the notepad, weather and date on at all times. So now there is an added obstacle when creating wallpapers. If I center a figure in my wallpaper it isn’t a problem, but if you look at my example on the right, the woman I cut out is flat on the right hand side. The photo didn’t include all of her right arm so now there is a missing piece. I can’t just align her all the way to the right because then she’ll be covered up by the gadgets. So my solution is to create part of a frame.
First I take the shapes tool and draw a long rectangle from the top of the image to the bottom. It doesn’t have to be the exact same size as the gadgets, but it will look better if it is. Then I apply a gradient to it using the layer style options. (Right click on the layer with the rectangle you drew). What this does is it separates the gadgets from the wallpaper entirely so that it gives the illusion that the wallpaper is starting where the gadgets end. Then when I align the figure to the rectangle, nothing is covering her face. This is a fun technique to play around with because if your gadgets don’t go all the way to the bottom of your screen, you can add some tiny pictures on the wallpaper, placed under where the gadgets are so they fill the gap. Like mine, for example, is only three gadgets. So I take a screenshot of my desktop (push the ‘print screen’ key on your keyboard then select paste in your photoshop document) and this allows me to see exactly where the gadgets end. Then I shrink down other pictures I like so they almost look like their own gadget (there is a slideshow gadget, but it can eat up processing power to leave it on).


")


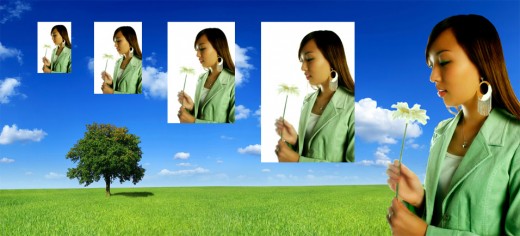
Piecing together the background
Let’s say that you like the background behind your figure and you want to keep it, but the image is just barely too small for your computer’s resolution resulting in a smudged appearance when it’s stretched. Another option for you is to replicate pieces of the background in the added space to create the illusion of a larger picture. For my example there is sky and grass surrounding the figure. I’m going to start by copy and pasting my original picture into a file with the proper screen resolution. This will allow me to see how much space I need to fill. Next, I’ll use the lasso tool to select the sky and grass and make a copy of it on its own layer. Now I’ll move that new layer to the blank space I need to fill. It won’t look great at first, but continue this process, using pieces at the edge of the image you’re enlarging, until all the blank space is covered. Next you’ll want to feather the edges of each layer to make them blend in better. Use the eraser with a feathered edge and just follow along the edge of each layer until they look kind of fuzzy. You might have to re-arrange them in order to cover up that white space, but once you’ve done it, you will have something that resembles a background. Now for some people you can stop here and it will look just fine. However even after using the feathered eraser, it might still be obvious that you’ve made edits to the edges. In this case you’ll want to flatten the image (or make a copy of the merged image) and select the patch tool. Then, using the patch tool, take a selection of the edge like before, and drag it on top of the part of your picture that blends together poorly. The patch tool will then help it blend together.
If neither of these methods work and your edges still look edited, then you can use the gradient tool. I mentioned this in the first article, but it could stand to be repeated. Simply create a new layer and select the gradient that is part black and part transparent. Then click and drag it near the edge. This will very gently cover up any mistakes you made while still giving the illusion of a larger picture.
Conclusion
If the internet was filled with nothing but high resolution pictures, we wouldn’t have this problem to begin with, but since we do, I hope that some of the methods I mentioned above, and in my previous article, have helped you. Always keep in mind that if you’re using copywritten images for your wallpapers, you shouldn’t try to re-distribute them for any sort of profit. (I used stock photos for my examples.)