A Guide to Compressing and Extracting Computer Files

Step 1 Purpose of compressing files
You might be asking yourself; why should I even bother compressing files? After all, if you have a large hard drive, there isn’t a whole lot of need to save space. However there are other advantages to compressing your files.
The first is obvious; it shrinks multiple files so that they aren’t taking up as much space. While you might not need the extra space, keep in mind that when you want to back up your files on a flash drive or external hard drive, it might not have as much space as your PC’s hard drive. Also, if you are sending these files to a friend, you have to keep in mind things like email attachment limits and how much space your friend has on their computer. So compressing the file size makes these files easier to manage.
The second most common use I have discovered for compressing files is that it allows you to send multiple files over an email or messenger program, without going through the hassle of sending each one individually. Say, for example, you want to send your friend ten pictures and twenty text documents. Rather than attaching all thirty files to an email, you can compress them all and send just the one file.
Step 2 Compressing Files
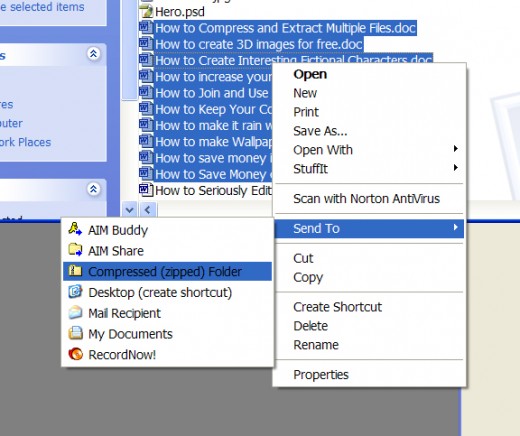
There are several ways to accomplish compressing your files, but I will focus on two. First, go to the folder where your files are located. Next you want to highlight all the files that will go into the compressed folder. You can accomplish this by clicking and dragging the mouse over top of the files you want. Or you can hold the shift key on your keyboard, select the first file you want, then the last and it will select all of those in between. Once all of your files are highlighted, right click on any one of the highlighted files. (Don’t left click because it will de-select all of the files and you will have to highlight them again.) A menu will appear when you have successfully right clicked. From this menu go down to ‘Send to’ then ‘Compressed folder’. The little icon should look like a folder with a zipper on it. Once you click on it, windows will create a new compressed folder and put all of the selected files into it.
The other way you can accomplish this is to once again highlight your files, but this time, from the right click menu, select ‘copy’ instead of ‘send to’. This will copy all of your files. Next right click on the white space next to your files so that you get a different menu. From this menu select ‘new’ then ‘compressed folder’. Doing this will allow you to name the folder right away. Just make sure you keep the .zip extension after the name. Once the folder is created, double click to open it. Then, right click in the white space and go to ‘paste’. This will put all of your files in the compressed folder. This is an important step to know because you may find that you want to add files to the compressed folder later on. So rather than creating a whole new folder, you can just copy the new files and paste them into the old compressed folder.
Step 3 Extracting Files
After you’ve compressed your files, you might want to extract them so you can view them again. Or maybe someone sent you files in a compressed folder and you’d like to know how to view them. Extracting is a simple process, you just need to designate where the files inside are going to go.
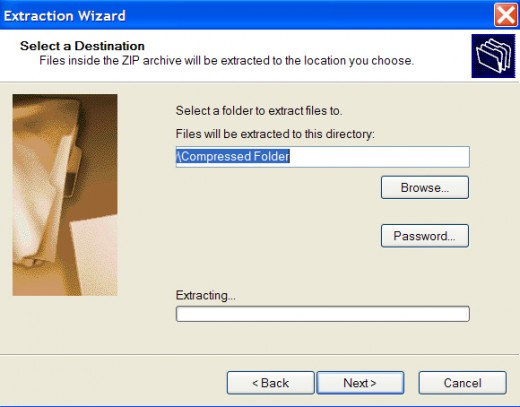
First, find the compressed folder that you want to extract. Then right click on it. From that menu select ‘extract all’. This will bring up the ‘extraction wizard’. From this window select ‘next’. Now comes the part where the wizard will ask you where you want the files to go. By default it will create a new folder with the same name as the compressed folder and put that in the same location as the compressed folder. But if you want the files to go somewhere else you can push the ‘browse’ button and select an existing folder to send the files to. Once they have been extracted the wizard will ask you if you want to view the files now. Check the box depending on your choice. And you’re done!
Some Additional Tips:
- Windows uses the ‘compressed folder’ as its default, but there are other programs like winzip that accomplish the same thing.
- Compressing files can vary in how much smaller a file can be made. Pictures won’t get much smaller when compressed, but text documents will get significantly smaller.
- Never download or extract a file of any kind from a person you don’t know or trust


